Featured

Getting Rid of Nested Case Statements with Pipelines in Erlang

Pipelines.

What is a Pipeline?

Many will know the tried a tested GoF pattern to reduce the appearance of nested case statements – The Chain of Responsibility. It works by splitting up the statements into their own class implementations, and creating a chain of them (The output of the first goes in as the input of the second, and so on). At any point, the chain can exit, meaning the rest of the chain is not run; exactly the way a dump of nested case statements would work.

If you are well versed in Haskell, you may know that this type of behaviour can be achieved using Maybe Monads and the >>= operator:

firstFunc input >>= secondfunc >>= ... >>= lastFunction

This is probably something more like what we want to achieve in Erlang, given it’s a functional language. But there are not user defined infix operators in erlang (barring parse transforms, as shown here: https://github.com/pouriya/pipeline).

Jumping in

Well, ignoring the roadblock ahead, we can start by defining a maybe object in erlang:

-record(just,       {val :: any()}).
-record(nothing,    {}).

-type just(Type)    :: {just,    Type}.
-type nothing() :: {nothing}.
-type maybe(Type)   :: just(Type) | nothing().

Now lets create a chaining operator. It needs to take in a function, and a Maybe value, and either apply the function to the value within the monad (Lifting?) if it’s a just value, or just return the nothing value.

-spec '?>'(fun((any()) -> maybe(any())), maybe(any())) -> maybe(any()).
'?>'(Function, #just{val = Val}) ->
    Function(Val);
'?>'(_Function, Maybe = #nothing{}) ->
    Maybe.

Ok, so now we have that, we can preform a rubbish chain of responsibility pattern (Given no infixing). First we need the functions that will be used:

do_something(Str) ->
    #just{val = Str}.

now_do_thing(Str) ->
    #just{val = Str}.

and_then_do_this(Str) ->
    #just{val = Str}.

And now we can chain it!

'?>'(and_then_do_this, '?>'(now_do_thing, do_something(Data))).

Wow!

So now to make it not rubbish.

Chain Function

If we take a step back a think about what this is doing, we realise this is a type of fold over a list. Usually, we would use a fold to apply a function on a list of variables. However now, we are using a list of functions and applying them to an input variable. With this piece of knowledge, we can create the following chain function:

-spec chain(list(fun((any()) -> maybe(any()))), any()) -> maybe(any()).
chain([], Input) ->
    #just{val = Input};
chain([Func | Funcs], Input) ->
    lists:foldl(
        fun(IterFunc, Acc) ->
            '?>'(IterFunc, Acc)
        end,
        Func(Input),
        Funcs
    ).

This function takes in a list of functions, and input data. It applies the first function of the input data, then does a foldl over the rest of the functions. At each point, the ‘?>’ operator is used to apply the function to the result of the previous function. If the result is a just, the function is run. If its a nothing, the nothing is returned without the function running.
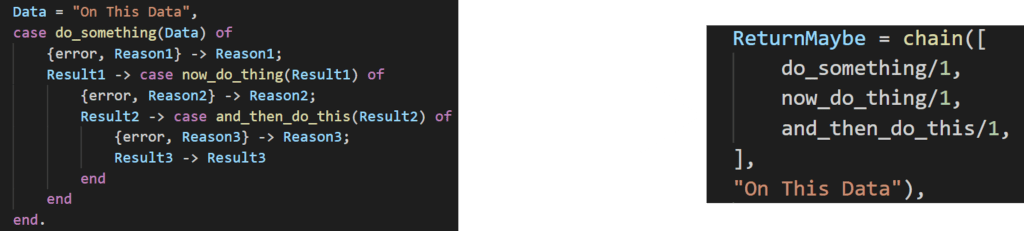
Usage

ReturnMaybe = chain([
    do_something/1,
    now_do_thing/1,
    and_then_do_this/1,
],
"On This Data"),

And that’s it. The above will run do_something(“On This Data”). That function will return a maybe. If it’s a just, now_do_thing(ReturnVal) will run. If that passes, and_then_do_this(ReturnVal) will then run. A maybe will be returned, which you can check for the result.

An extension to this could involve adding an error message to the nothing record, and logging data on why the chain exited early:

-record(nothing,    {error_message :: binary()}).
-type nothing() :: {nothing, binary()}.

And that’s it. Hope that proved useful to someone. If you have any comments, please leave them below!

Hungry Boys

In his ravenous hatred he found no peace, and with boiling blood he scoured the Umbral Plains seeking vengeance against the dark lords who had wronged him.

— SLAYER’S TESTAMENTS

HUNGRY BOYS Game Help Guide

Welcome to the user guide for Hungry Boys! Firstly, thanks for playing and i hope you enjoy it. If you’d like to leave some comments on how the game can be improved I’d be more than happy to hear! But now, to the good stuff…

Hungry Boys Icon

What’s this game about?

You take control of a small group of white circles, known as your boys, and can tell them where to go via pressing the screen. Your boys will then fly their and collide with anything in-between. When you collide with an enemy, they will take damage. However, so will your boys. Below is a full description of every enemy in the game.

Enemies

Normal Enemy

Normal enemies are very weak and have a small attack. A light graze from one or you boys is sure to dispense with this enemy.

Dangerous Enemy

Dangerous enemies can hit hard, but cant take anything. They may take out the first couple of boys, but they are not match for a group.

Rock Enemy

Rock enemies aren’t very dangerous, but will take a good beating before going down. Make your you tackle these first. Or better yet, why not try and infect it…

Dangerous Enemy

Finally, a helpful enemy. This little helper wont end your infinite run, and wont even attack you. When hit, it releases an aura of healing energy your boys might be in need of.

Smoke Enemy

The first of the 3 gasses. This enemy will remove effects from your boys.

Ice Enemy

The second of the 3 gasses. This enemy will freeze your boys, giving them extra defence equal to your boys special defence. They will then be super effective against the metal enemies.

Fire Enemy

The final gas enemy. This enemy will set your boys on fire, giving them extra attack equal to your boys special attack. They will then be super effective against crystal enemies.

Bubble Enemy

This enemy will absorb all the boys it touches. Until it gets to be too much for it. Then…. POP!

Infected Enemy

Watch out for this one. It will cause your boys to become infected. Then any boy or enemy it touches will become infected too, and slowly die. Increasing special defence will stave of certain death for only so long…

Metal Enemy

This big boy will take a beating. Unless you have some frozen boys that is.

Crystal Enemy

This big boy will also take a beating. Unless you have some fire boys that is.

Bomb Enemy

STAY AWAY! You have been warned…

Challenge Mode

Test your boys strategies in this gauntlet. No upgrading or items allow. Just base level boys and all the enemies you can handle.

Infinite Mode

Destroy the enemies (except the bomb, stay away!) before they get to the bottom. The longer you survive, the more stars you get, and the better items you will receive.

Free Play Mode

Chill out in this no stakes version of infinite mode. No upgrading, but also no losing. Unless you run out of boys that it.

Workshop

View all your hard earned items, equip and sell. Or…

The Forge

Using stars gained in infinite or challenge modes, you have the option to combine equipped items with items in your inventory. the price depends on the item value, and the amount of effects gained can be heavily affected by whether you are trying to add a new affect.

Again, thanks for playing! Any feedback is welcome!

Gym Notebook User Guide

They are rage, brutal, without mercy. But you. You will be worse. Rip and tear until it’s done.

— Doom Seraphim.

Gym Note Book on Google Play: https://play.google.com/store/apps/details?id=com.nick.wood.gym_note_book

Err wut is dis?

Are you sick to death of taking a notebook to the gym to track your weight lifting progress? Do you hate the fact that every other gym app tries to tell you what to do in the gym instead of just letting you record what you lift? Then the Gym Notebook is for you!

Here at Gym Notebook we won’t tell you what to do. Your a big lad/lass now, you know what your doing. All you have to do is add an exercise and start tracking your progress. Below is a full tutorial on how to use it.

Starting the app.

Well this it’s easy. Obviously click on the app icon. This will take you to the starting screen.

From here you can choose to start the workout, find help on this app with some handy links, or watch an add to support the developers.

Start Workout

After pressing start workout, you will be relocated to the main exercise list page where you will be able to select an exercise you’ve previously created, or search the list via clicking on one of the tags at the top. More on these late.

Now yours will looks pretty blank at this point. Just like a freshly opened notebook. To add an exercise, simply click the floating red button in the bottom right hand corner. This takes you to the exercise creation page.

Here you can give the exercise a name, like bench press (obviously the first one you will want to add). Then you can give it a simple description. Here I like to put notes about form. Or maybe you can write a goal here or a quote to keep you motivated like:

F**k stress, Bench press.

Random gym t-shirt off the internet

Then you can assign tags to the exercise. The tag can be anything you like, but some examples are as follows:

  1. Muscle group: the name (or names) of the muscle group you are targeting. For bench press you could add chest and front delts.
  2. The workout this fits into: if you are doing a push pull legs, upper body or a bro split, you may wish to put information about that here. For instance, bench press could have the tags push, upper or Monday.

When are a finished editing you new exercise, just press create. If you want to cancel the creation, just the your android back button.

Either way you will be taken back to the home screen, which now looks a little less empty. The main list now contains you new exercise and A list at the top of the screen shows the tags you have entered. But clicking on a tag you will filter which exercises show up in the screen. If you wish to see them all, just press all.

Now for the gym!

When you’ve just finished a set at the gym and want to record it, press the exercise in the list. You will be taken to the exercise home page.

At the top is a graph. This will show weights and dates of your sessions. At the moment it will be empty but after a couple of days usage you will see a line representing the weight you lifted compared to the date. The number at the bottom is the day of the month.

To add a session, press add workout. This will usher you onto the workout creation page:

This contains a list of sets, where you can set a weight and a rep number. Press add to add a new rep. You can also set the date, but my default it will be set to today’s date. Pressing the back button will take you back to the exercise home page, saving your workout.

And that’s pretty much it. Simple! So bin the notebook (or recycle I guess given how angry Gretta Thunberg is), uninstall all the other gym apps that make you do things like not do chest every day, and start making them gains!

I’m constantly updating the app, so if you don’t like something, or think something would make it better, feel free to leave a comment and I’ll try and get round to it.

Thanks!

Design a site like this with WordPress.com
Get started